Sunday, February 14, 2021

Building an Apartment Sized Workbench - Part 1


Starting to build an Apartment Workbench

After building a stand for my3D printer, I also quickly realized that I also needed to have some sort of small workshop space in the house.

Now don't get me wrong, I am still going to have the "big" shop, however, it is a few miles down the road from my house, and sometimes, it's just not worth the trip if I have some sort of quick or small project that needs to be done. 

My 3D printer is currently sitting comfortably on its stand in a corner of my family room. Looking at where I have it located, I noticed that I just had enough space beside it for a little work area and I did have a fair bit of scrap wood pieces leftover that was still looking to be put to good use.  

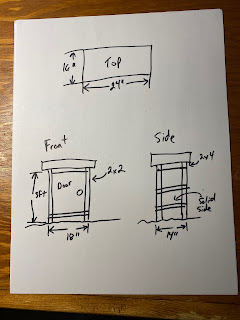
Looking at the space around the 3D printer, I figured that I could put it in a small work area that would be about 2 feet wide and 16 inches deep. While not a lot of space, it should be sufficient for the small projects that I had in mind. 

I also wanted to make the workbench something that could more or less blend into the family room, meaning that I wanted to make it look more like a cabinet, allowing for the storage of tools and supplies within the workbench, hidden away from sight. 

Due to its small size, this would make a very nice accessory for someone who lives somewhere like an apartment, but would like to have their own dedicated "shop space". 

Based on the space restrictions that I had to work with and the materials that I had on hand, I did up a quick sketch of the design for my workbench

Design sketch


The workbench will utilize a combination of 1 X 5 pallet deck boards in addition to 3/4 inch thick plywood strips for the bulk of the construction.  The main support of the workbench will be handled with some 2 X 2 pine posts that I had on hand from another project that I had started a long time ago but had since abandoned for some reason. 

To start the build, I first focussed on the business end of the workbench - the top. 

I first took 4 pallet deck boards. After I planed them down to remove the rough surfaces, I cut them to a length of 22.5 inches. After that, I applied some glue along the edges of the boards and clamped them together so that I got a 22.5 X 18 board. 

After the glue had dried, I trimmed the board to 22.5 X 14.5.  

Pallet deckboards
Boards glued together

With the board glued up, I added some additional strength by cutting out two 2 inch wide strips of plywood at a length of 10 inches and placed them to the bottom of the workbench top so that they straddled all the planks were glued together. The plywood strips were positioned fairly close to the center of the workbench top, spacing them about six inches away from each other. 

I then attached them to the bottom of the workbench top with some brad nails.

Plywood strips
Attaching strips to the bottom

The next thing I wanted to do was to add a bit of a lip around the outside edges of the top to serve as a barrier to prevent small things like screws from rolling off the workbench. 

To create this lip, I took some plywood and cut them down to a width of 1.25 inches. 

I trimmed the plywood strips so that I had two 16 inch long strips and two 24 inch long strips. I attached the 16-inch strips to the sides of the workbench top, making sure that the bottom of the strips was flush to the bottom of the workbench top, and secured them in place with glue and brad nails. 

After that, I attached the 24-inch strips to the front and back of the top.

At this point the construction of the top of the workbench was complete

Plywood strips
Attaching the strips
Top complete

Working my way down, I next focussed on creating a mounting point for connecting the support legs of the workbench to the top.  

For the mounting points, I cut out two 10 inch long pieces of 2 X 4.

I then placed the 2 X 4's on the bottom of the workbench top along the ends of the top, making the 2 X 4's flush to the pallet deck board part of the top (or, set in from the plywood border of the workbench top) and spaced them equally between the front and back of the top. 

Once the 2 X 4's were positioned, I attached them to the top with 3-inch wood screws drilled into the mounts from the top of the workbench top. 

2 X 4 mounts
Attaching the mounts

Next, I took the 2 X 2 pine posts and cut 4 of them to a length of 3 feet.

2 X 2 cut to 3 feet

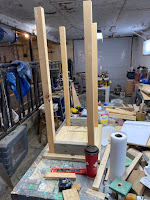
Taking the posts I then attached them to the workbench mounts by placing a post at each end of the mounts and securing them to the mounts with two 3-inch wood screws. 

Attaching post to the mount
Support legs installed

The next step was to further strengthen the support legs of the workbench.  To do this, I first cut out some 2 inch wide strips of plywood. 

After that, I did the following:

  • Cut three 22.5 inch long strips and attached them to the workbench supports where what will be the back of the workbench, one strip was attached to the supports just underneath the top of the workbench, one strip was attached 2 inches above the bottom of the supports and the third strip was attached 16 inches from the bottom strip. 
  • Next, I cut two 22.5 inch long strips and attached them to the workbench supports where what will be the front of the workbench, one strip was attached to the supports just underneath the top of the workbench, with the other strip attached 2 inches above the bottom of the supports
  • After that, I cut four of the strips to a length of 14.75 inches  and attached them to each of the "short" sides of the workbench supports, overlapping them with the strips that I had attached to the back of the workbench 

Plywood strips
2 inches up from the bottom
Attaching the strips

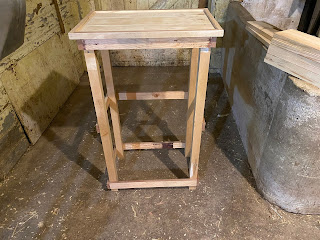
This definitely made for a much more structurally sound workbench 

Much more structurally sound

While it will have a purely utilitarian function, I did say that I wanted to have the workbench to be reasonably attractive, since it will be residing in my home. 

While it is a very versatile material, the only thing that I have against plywood is the layers that you get on the ends of it. I typically don't like that sort of look on my projects, so as a rule I usually cover plywood ends with some iron veneer tape. 

Even though it is going to be eventually painted, I did take a moment to cover the plywood seems with some veneer tape. 

Attaching veneer tape

Right now I have a pretty functional workbench. If this was to end up in a garage or basement shop, I would be inclined to call it good at this point. 

Ready for the next step

But like I said, it will be staying in a part of the house that gets a lot of activity, I really want to dress it up more to hide its utility function. 

Next week will be spent making it a bit more pretty. 

No comments:

Post a Comment