I had to take a bit of a break from the radio scanner project to attend to some urgent house "repairs".
I don't know why, but it seems like I have to replace a dishwasher in my house every 5 years or so.
Granted, with a family of four and both parents working, the dishwasher is in almost daily use, so it does get quite a workout at our house. But like clockwork, at the 5-year mark, it always starts getting a little tired, making very unpleasant noises, and the dishes almost seem to come dirtier than when they went in.
Inevitably, the cause of all the misery is some part that, when including the labor to install it, costs almost as much as what I had paid for the dishwasher originally.
This is all rather frustrating since I don't seem to have the same issue with the other appliances in the house. My washer and dryer are both pushing 20 years now and other than a new heating element for the dryer. they are both working well. The same goes for the fridge and stove. Yet I am looking at my 4th dishwasher since I bought my house.
On the bright side, I have gotten a bit of practice on installing dishwashers, so I can usually get a new one installed, up and running within a couple of hours.
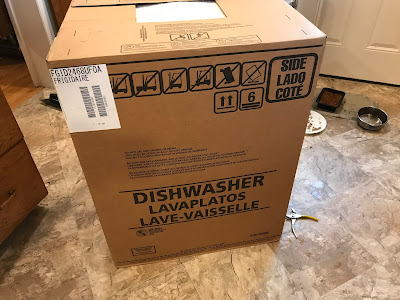
So, with a brand new dishwasher sitting in a box in the middle of my kitchen, I started work.
To start, I needed to remove the old dishwasher from its lair. For the most part, it is just a simple matter of disconnecting the electrical, water supply, and drain hose, which really is just the reverse of the installation process that I'm about to do.
But of course, before I did any of that I made sure to turn off the power and water supply to the dishwasher.
With the water and power shut off and the old dishwasher removed and awaiting an autopsy, I decided it was time to meet my new challenge.
To removed the new dishwasher from its box, I needed to make a cut along the bottom of the box along the marked dotted lines. After a few careful cuts with a utility knife, I lifted the box off and took a look at the new dishwasher.
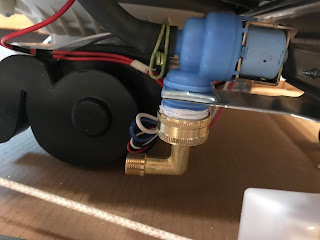
After removing some Styrofoam packing material, I needed to take a look at the water intake connection. To do that I first needed to remove the bottom trim piece from the front of the dishwasher in order to fully expose the connection point.
Removing a couple of screws exposed everything.
At this moment I am confronted with my biggest pet peeve about dishwashers - the water intake connection.
While the principle is all the same - basically you are just connecting a water line to the dishwasher, but it seems that every dishwasher manufacturer wants to have their own special way to hook up water.
My old dishwasher required a 3/8 inch connector, but this new dishwasher wants a common water faucet connector. Since I already had a plumbed water line with a 3/8 inch connector which I really didn't want to replace, I had to make an unplanned trip to the hardware store to buy an adapter.
I really wish they would maintain a standard size.
Well, I did need to get some Teflon tape anyway.
I then turned the water supply back on and did a quick test for leaks, tightening the connections if needed.
With all the water and drain lines connected, I can finally slide the new dishwasher into place under my kitchen countertop.
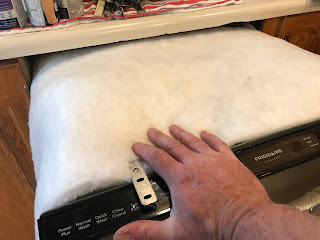
As part of the soundproofing that's used, most dishwashers have some form of batten that covers the outside of the dishwasher body. This batten usually sits pretty loosely on the dishwasher, meaning that it can easily get caught and pulled off the dishwasher when it's being slid into place.
Slow and steady is definitely the rule when sliding the dishwasher into position.
Once the dishwasher is in place, I took a quick look at how it's sitting under the cabinet. If it's sitting a little crooked, the dishwasher can be adjusted by moving the feet on the bottom with a pair of pliers until things are nice and level.
The next major step is to do electrical connections. Dishwashers need to be hard-wired into your house wiring and will usually have its own dedicated circuit with its own circuit breaker.
Because of this, instead of a "plug", it's bare wires that you need to connect.
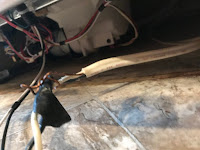
To make the connection, you need to fish out the house wiring for the dishwasher out in order to have it sitting out in front of the dishwasher.
Wiring is a matter of routing the house wiring through the access hole in the junction box, connecting the copper ground wire to the green screw on the dishwasher, and connecting the white and black house wire to the corresponding colored wires on the dishwasher using a simple pigtail connection. The pigtails are then held in place and insulated with electrical nut connectors.
Once everything was connected, I then replaced the junction box cover and ran down to the breaker box and turned the power to the dishwasher back on.
The absence of a loud zapping noise was a good sign.
To finish up the installation, I then replaced the bottom trim piece that I removed back when I just removed the dishwasher from its box.
And with that, the new dishwasher was installed.
Granted, with a family of four and both parents working, the dishwasher is in almost daily use, so it does get quite a workout at our house. But like clockwork, at the 5-year mark, it always starts getting a little tired, making very unpleasant noises, and the dishes almost seem to come dirtier than when they went in.
Inevitably, the cause of all the misery is some part that, when including the labor to install it, costs almost as much as what I had paid for the dishwasher originally.
This is all rather frustrating since I don't seem to have the same issue with the other appliances in the house. My washer and dryer are both pushing 20 years now and other than a new heating element for the dryer. they are both working well. The same goes for the fridge and stove. Yet I am looking at my 4th dishwasher since I bought my house.
On the bright side, I have gotten a bit of practice on installing dishwashers, so I can usually get a new one installed, up and running within a couple of hours.
So, with a brand new dishwasher sitting in a box in the middle of my kitchen, I started work.
To start, I needed to remove the old dishwasher from its lair. For the most part, it is just a simple matter of disconnecting the electrical, water supply, and drain hose, which really is just the reverse of the installation process that I'm about to do.
But of course, before I did any of that I made sure to turn off the power and water supply to the dishwasher.
With the water and power shut off and the old dishwasher removed and awaiting an autopsy, I decided it was time to meet my new challenge.
To removed the new dishwasher from its box, I needed to make a cut along the bottom of the box along the marked dotted lines. After a few careful cuts with a utility knife, I lifted the box off and took a look at the new dishwasher.
After removing some Styrofoam packing material, I needed to take a look at the water intake connection. To do that I first needed to remove the bottom trim piece from the front of the dishwasher in order to fully expose the connection point.
Removing a couple of screws exposed everything.
At this moment I am confronted with my biggest pet peeve about dishwashers - the water intake connection.
While the principle is all the same - basically you are just connecting a water line to the dishwasher, but it seems that every dishwasher manufacturer wants to have their own special way to hook up water.
My old dishwasher required a 3/8 inch connector, but this new dishwasher wants a common water faucet connector. Since I already had a plumbed water line with a 3/8 inch connector which I really didn't want to replace, I had to make an unplanned trip to the hardware store to buy an adapter.
I really wish they would maintain a standard size.
Well, I did need to get some Teflon tape anyway.
Once I had the needed parts, I started the water line install by putting a couple of wraps of Teflon tape around the water connection on the dishwasher.
I then connected the adapter to the connection point and tighten it down as tightly as possible.
I then positioned the dishwasher close to the waterline and, with a bit more Teflon tape on the adapter, I then connected the water line to the adapter, tightening it as much as possible.
I then turned the water supply back on and did a quick test for leaks, tightening the connections if needed.
The next step was to connect the drain hose. Thankfully there does seem to be a common standard for this in the dishwasher industry, and the drain hose on the dishwasher easily fitted into the connector I had from the old dishwasher to the drain under my kitchen sink.
With all the water and drain lines connected, I can finally slide the new dishwasher into place under my kitchen countertop.
As part of the soundproofing that's used, most dishwashers have some form of batten that covers the outside of the dishwasher body. This batten usually sits pretty loosely on the dishwasher, meaning that it can easily get caught and pulled off the dishwasher when it's being slid into place.
Slow and steady is definitely the rule when sliding the dishwasher into position.
Once the dishwasher is in place, I took a quick look at how it's sitting under the cabinet. If it's sitting a little crooked, the dishwasher can be adjusted by moving the feet on the bottom with a pair of pliers until things are nice and level.
The next major step is to do electrical connections. Dishwashers need to be hard-wired into your house wiring and will usually have its own dedicated circuit with its own circuit breaker.
Because of this, instead of a "plug", it's bare wires that you need to connect.
To make the connection, you need to fish out the house wiring for the dishwasher out in order to have it sitting out in front of the dishwasher.
Under the front of the dishwasher, just underneath the door, there will be an electrical junction box.
Removing the screw that holds the box in place and removing the box shows white and black wires along with a green screw which will be the mounting point for the ground wire.
Wiring is a matter of routing the house wiring through the access hole in the junction box, connecting the copper ground wire to the green screw on the dishwasher, and connecting the white and black house wire to the corresponding colored wires on the dishwasher using a simple pigtail connection. The pigtails are then held in place and insulated with electrical nut connectors.
Once everything was connected, I then replaced the junction box cover and ran down to the breaker box and turned the power to the dishwasher back on.
The absence of a loud zapping noise was a good sign.
Finally, in order to prevent the dishwasher from tipping forward when the door is opened. I connected the dishwasher to the bottom of the kitchen countertop by attaching the two tabs on the top of the dishwasher to the counter with a couple of 1/4 inch screws.
While installing the screws, I took care that the screws did not poke out of the top of the counter.
To finish up the installation, I then replaced the bottom trim piece that I removed back when I just removed the dishwasher from its box.
And with that, the new dishwasher was installed.
Now my dishes are clean and sparkly, at least for another 5 years 😄


No comments:
Post a Comment