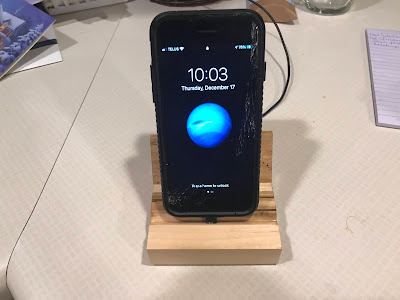
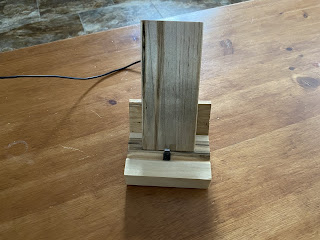
With the holidays upon us, I usually try to make something that I can manufacture quickly to hand out as a last-minute gift for anyone that happens to unexpectedly drop by the house.
The idea is to make something that is attractive, useful, and can quickly make a batch of them to have on hand.
This year I managed to get my hands on a bunch of wormy and spalted maple, mostly in sizes that didnèt lend too well to making anything real sizable. I find this type of wood to have a nice design in the wood grain which immediately makes any project very attractive.
While I did use a lot of my larger pieces of maple to build my tablet stands, I did have a pile of smaller pieces on hand. I just did not have the heart to just chuck them into the woodstove.
The inspiration hit me when I charged my smartphone the other day. To charge my phone I had to plug it into a charging cable. While that in of itself is not a big deal, I usually charge my phone on my desk, which means that my phone ends up lying on top of the various bits of stuff that I usually have sitting on my desk.
This usually means that the phone usually ends up lying face down or in some other position where seeing any texts or other notifications is not really possible.
It would really be nice if I had some way for the phone to sit on a stand while charging so that I can easily see any important notifications.
A quick search on Amazon showed a lot of stands that did just that, but for the most part, they all looked to be just made out of cheap plastic - not really attractive in my book.
Thinking back to the tablet stands, I figured that the same type of arrangement would work just as well for a smartphone, plus I could have it so the charging plug would somehow embed into the bottom of the stand, creating an anchor for the phone to sit on the stand while it was charging.
Even better, I could use my small bits of maple to make it.
After some doodling, I came up with a basic design, which as I said, was based on the same basic design as the tablet stand.
I started the build by making the base of the charger, which will be a 1.5-inch thick piece of maple cut to a size of 4X4 inches.
To do this I glued and clamped together two pieces of 1.5X2 wormy maple. The wood pieces needed to be at least 2 inches long. Luckily I had pieces of maple that were over 4 inches long, making it possible for me to make multiple chargers in one sitting.
Once the glue had dried, I then cut the glued board into a 4X4 square.
To create a resting place for the phone on the base, similar to what I had for my tablet stands, I wanted to add a small groove into the top of the base, about a half-inch off of one side of the base.
To make the groove I put in a 3/8 inch groove bit in my router, set the fence of the router about 3/4 inches to accommodate for the width of the groove but still maintain that 1/2 inch distance from the edge, and set the depth of the bit to about 1/2 inch.
With the router settings done, I then ran the base through, adding the groove to the top.
I first marked the center of the groove and using a block of wood with a 30-degree angle cut into it as a jig, I drilled a 3/8 inch hole at the spot that I marked, drilling the hole at a 30-degree angle with the angle heading towards the front of the base
Next, I snaked the cable through the slot in the bottom of the base until the cable came out through the back of the base.
With the hole cut for the cable to poke up through the charger base made, I needed to sort out how to route the cable underneath the base so that it would be as out of the way as much as possible.
To do this, I chose to make a small 1/4 inch deep channel on the bottom of the base going from the hole that I had drilled to the back of the base.
To make the slot I decided to use my trusty Dremel Trio with a small straight bit. The challenge that I had was that I needed to have some sort of guide to run the Trio against in order to keep the groove as straight as possible.
To accomplish this I made myself a simple little jig of a couple of 1/2 thick pieces of scrap wood cut to a size of 2 X 4 inches. I then sandwiched the 2 pieces on top of each other with a one-inch offset and glued them together.
The purpose of the overlap is to have the Trio sit on top of the bottom part of the jig with the fence of the Trio sitting against the top part of the jig.
I then clamped the jig on the bottom of the base alongside the hole and cut the slot along the bottom.
With the base taken care of, I next looked into creating a back for the phone to lean up against.
I took a piece of 1 X 2 maple and with my table saw blade set to a 30-degree angle cut to a length of 5 inches.
Next, while still keeping the saw blade set at a 30-degree angle, I cut out the support for the back by adjusting the fence on my table until I was able to cut a rectangular piece of wood that had a height of approximately 1.75 inches,
After that, I reset my saw blade to 90 degrees and trimmed the rectangular piece to a length of 4 inches.
At this point, I had all the wood components of the stand made, and it was time to do some assembly
I started by attaching the triangular support to the base. I applied some wood glue to the bottom of the support and attached it to the top of the base, placing it slightly more than an inch back from the groove in order to allow for the back to be attached later. I also made sure that the support was on the base as squarely as possible.
Once things were in place, I then allowed the glue to dry.
After that, I then attached the back to the support and base by also applying some wood glue to the 30-degree cut edge of the back and to the center of the 30-degree side of the support. I then attached the back to the base and support, making sure that the back was centered on the base and was flush to the back edge of the groove on the top of the base.
With that, the major construction was complete, the next step was to install the charging cable to the stand, but first I needed to give the stand a couple of coats of varnish
To install the cable, I first got a standard charging cable that was made for my phone for a few dollars at my local dollar store, making sure that that the cable was at least 3 feet in length.
I started by feeding the phone end of the cable through the hole in the bottom of the base,
I kept feeding the cable through until enough of the plug poked out through the top of the base that would allow for a proper connection to the smartphone
I then secured everything in place with a good amount of wood glue.
Once the glue dried, I put some felt feet on the bottom of the charging stand, flipped it over, plugged it in, and connected my phone.
So far this stand has been working beautifully, I can easily see my phone's screen while it's getting charged up. It has been holding up well to the constant abuse of having the phone being docked to it constantly.
They have also been well received whenever I gave them as gifts.
Not bad for scrap wood.


No comments:
Post a Comment