Sunday, November 1, 2020

Building an Instagram Posting Bot


As a result of the 35mm film slide converter project that I had built a while back, I have managed to digitized a good number of film slides. The tragedy of all this is that while I definitely enjoyed looking at and preserving images that haven't been viewed in decades, I didn't just want to have them be just stored away again on some hard drive, only to be faced with being obsolete and lost to time again in another 10 or 20 years when technology moves us in a direction that I can't even conceive of now. 

Instead, I wanted to somehow share these treasures with the world. I started out by setting up a new webpage, "A Slide A Day" where I released a new photo each day with the capability of loading up several years worth of photos - so theoretically, if something catastrophic ever happened to me, I can pretty much guarantee that this website will continue to serve up new pictures way into the future. 

While the website is a nice archive for the photos. it may not ever get the broad audience reach that I think these photos deserve. 

While trying to figure out this quandary, I happened to chance upon Instagram. I knew that Instagram was a fairly popular photo-sharing app, but I didn't really pay a whole lot of attention to it until now.  

When I looked into Instagram a bit more, I was actually quite intrigued by how easy it was to share a photo with a large audience.  

The problem that I had with Instagram was that it was very much focused on people that used smartphones, so much so that the only way that you can post a picture on Instagram is via a smartphone. If you pulled up Instagram on a Windows-based computer web browser, you can only view pictures, not post them.

The other issue was that Instagram was very much an "in the moment" type app - meaning that you could only post in realtime. You do not have the capability to schedule your posts ahead of time.

This was a bit of a problem for me since I really didn't want to have to stop what I was doing at some point during the day and remember to post something - I really want to have a bunch of pictures loaded up in a folder and just drip-feed pictures at a regular daily schedule - publish "a slide a day" like the name of my site suggested.  

Sunday, October 25, 2020

Dishwasher Autopsy

Dissection awaits!

Last week I ran through the trials and tribulations that I had in installing a new dishwasher. During the install, I kept grumbling about how I always seem to be replacing dishwashers every 5 years or so.

I've had so much practice in installing dishwashers, I am almost tempted to offer my installation services as a nice little side hustle. 

Now that my new dishwasher was humming away in my kitchen, I was now faced with a rather forlorn old dishwasher sitting on my back deck. 

I was actually pretty curious about what doomed it to my deck, so before it made one last ride in the back of my truck, I figured a little autopsy was in order. 

Besides, who knows what kind of salvageable goodies I could find. 

Sunday, October 18, 2020

A Simple Public Safety Radio Scanner with the Raspberry Pi - Landing on a Permanent Solution


Zeroing on the final configuration of the scanner

Now that I finished my dishwasher installation, I was now able to swing my attention back to my scanner project. 

Since I had now ruled out my Raspberry Pi Zero as a credible platform for my radio receiver, I had to take another look at my Raspberry Pi 4 as the foundation for my receiver. 

The Pi 4 had certainly a lot more horsepower at its disposal and as an added bonus I also had a touch screen attached to it, so this gave me an opportunity to try to have some sort of display as part of the receiver, versus just having a plain box which was my original plan. 

The first problem that I needed to attend to was the issue that drove me to the Pi Zero in the first place. 

I needed to figure out some other way to get sound from the receiver without that infernal hissing noise that I had from the phono plug output when the receiver is waiting for radio transmissions. 

The solution for that problem came to me rather by surprise during my last scouting mission at the neighborhood surplus store. 

Sunday, October 11, 2020

Installing a Dishwasher

My job for the evening awaits

I had to take a bit of a break from the radio scanner project to attend to some urgent house "repairs".

I don't know why, but it seems like I have to replace a dishwasher in my house every 5 years or so.

Granted, with a family of four and both parents working, the dishwasher is in almost daily use, so it does get quite a workout at our house. But like clockwork, at the 5-year mark, it always starts getting a little tired, making very unpleasant noises, and the dishes almost seem to come dirtier than when they went in.

Inevitably, the cause of all the misery is some part that, when including the labor to install it, costs almost as much as what I had paid for the dishwasher originally.

This is all rather frustrating since I don't seem to have the same issue with the other appliances in the house. My washer and dryer are both pushing 20 years now and other than a new heating element for the dryer. they are both working well. The same goes for the fridge and stove. Yet I am looking at my 4th dishwasher since I bought my house.

On the bright side, I have gotten a bit of practice on installing dishwashers, so I can usually get a new one installed, up and running within a couple of hours.

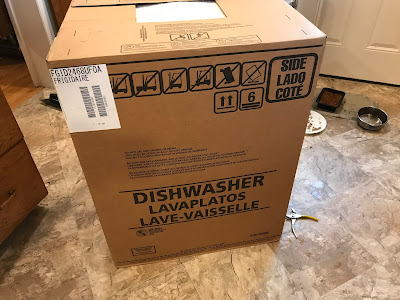
So, with a brand new dishwasher sitting in a box in the middle of my kitchen, I started work.

Sunday, October 4, 2020

A Simple Public Safety Radio Scanner with the Raspberry Pi - Part 3 - Trying to Downsize


Raspberry Pi 4 and Raspberry Pi Zero


After I built the amplifier last week for my scanner project, I quickly noticed a bit of a flaw in the design of the Raspberry Pi. 

When I tried to run the SDR in "idle" mode by turning the squelch setting on the rtl_fm application way up, I was still getting a fairly load hissing noise coming from the speaker when I was fully expecting silence. The issue stemmed from the way the sound circuit is configured for the 3.5mm phono plug on the Pi. Due to the size and circuit restraints of the Pi, there isn't a "true" sound card running built-in, meaning that the sound will truly never be high quality. Apparently having a constant hiss when there is no audio output is quite common. 

One option in resolving that is to plug in a dedicated USB soundcard which can be easily bought online for a few dollars, however, when I was doing my research I noticed that you could also use a Raspberry Pi Zero to create fairly decent audio by using its GPIO pins plugged into a pretty simple circuit (the Raspberry Pi Zero doesn't have a built-in sound port) 

I actually liked the idea of using the Pi Zero since it would give me the opportunity to really reduce the size of my scanner. As luck should have it, I also had a Raspberry Pi Zero on hand. 

To have the Pi Zero be able to connect to my amplifier, I needed to build an interface circuit that will act as a bridge between the Pi and the amp. This bridge, usually referred to as an audio HAT is actually a pretty common add on that you can buy from a lot of suppliers, however, when I came across a video by Tinkernut, I found that I could easily build my own audio HAT.