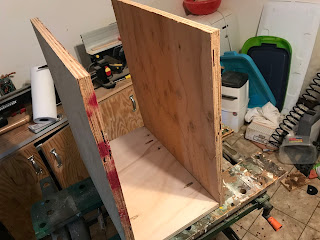
If I chose, I could have just joined the 2 pieces together at this point and I would have had a nice, simple functional desk.
However, as with anything that is made to order, the recipient for this particular desk had a need to have someplace to store their "stuff" so that it wouldn't be cluttering up the top of their desk, or even worse, sitting in a box beside the desk.
More specifically, they wanted the desk to have drawers.
In of itself, building drawers for the desk is a fairly straight forward concept. It's basically a matter of building a bunch of small boxes that would fit into a bigger box.
The deceiving part in all this is that getting the small boxes to fit properly can take quite a bit of fiddling, but I am getting ahead of myself.
For this post, the focus will be on the construction of the "big" box, or the cabinet that will eventually house the drawers.
At its heart, the drawer cabinet is really just a simple box made out of 3/4 inch (Good 1 Side) plywood.
I started off by cutting out two 18-inch X 10-inch and two 18-inch X 20-inch pieces of plywood.
In its current form, the easiest way to construct the box is to connect the corners together in a tradition butt joint that is then glued together.
The issue with this sort of joint is that it tends to not be very mechanically strong since the mechanical connection is only being done by the glue itself. While this is maybe OK for a joint that only sees light duty, we do need to add more strength to the joints in order to allow the cabinet survive the rough duty of having drawers opening and closing inside it all the time.
There are a lot of different ways to strengthen these type of joints, such as cutting slots at the joint locations with a biscuit jointer and inserting wooden biscuits into the slots before gluing the joints together, however, in this case, I'll strengthen the joints with wood screws via drilled pocket holes.
The main reason for this choice is that this would the joint very strong while the pocket holes themselves would be located inside the cabinet, hidden from sight by the drawers.
To create a pocket hole, I first needed to pull out my trusty Kreg Pocket Hole Jig. along with a drill and a small clamp to secure the jig in place on the plywood.
To cut the pocket holes I first marked out a spot 4 inches in on each side of the 18-inch length of the two 18-inch X 10-inch plywood panels.
I made sure that I had 4 locations marked and that the marks were made on the side of the panel that would be on the inside of the cabinet.
At each spot that I had marked, I placed the pocket hole jig, making sure that the center of the jig was on the mark that I made.
I then securely clamped the jig in place.
I then drilled the pocket hole be using the supplied drill bit for the jig.
The drill bit has a stop rig installed that ensured that the holes are drilled to a consistent depth.
Repeating the process for the other marked spots on the plywood, I ended up with 4 perfectly created pocket holes on the two 18-inch X 10-inch plywood panels.
Next, I then screwed in a 1.25-inch screw into each of the pocket holes in preparation of making the final joints.
Since I'm wasn't quite ready to do the actual joins, I only partially started the screws such that they were not quite poking through the edge of the plywood.
With the screws in place, it was now time to join the sides together.
I first started with one of the 18-inch X 10-inch and 18-inch X 20-inch plywood panels.
I started by applying a bead of wood glue along the 18-inch edge of the 18-inch X 10-inch panel.
I then joined the 2 panels together into a butt joint, with the edge of the glued 18-inc X 10-inch panel joined against the bottom of the 18-inch X 20-inch panel.
Once I made sure that the panels were squarely aligned at the edges, I then permanently secured them in place by fully screwing in the screws in the adjoining pocket holes.
Once the one side was done I then did the same with the other 18-inch X 20-inch panel of plywood.
I then clamped everything together to ensure a nice tight bond and allowed the glue to dry.
After the glue had set, I then attached the remaining 18-inch X 10-inch panel of plywood to the other end of the 18-inch X 20-inch panels and secured it in place with pocket hole screws and wood glue.
In order for the drawers to move freely in the cabinet (not to mention just making the cabinet look proper) it's critical to make sure that the cabinet is as square as possible.
To make the cabinet square, I took a few square blocks of scrap wood and temporarily attach them to the inside corners of the cabinet before the glue had time to set.
Once the glue was fully dried, I remove the square blocks and the cabinet was square.
While this effectively completes the construction of the drawer cabinet, the reality is that all we have at the moment is just a plywood box, not quite what I would consider something that would be part of a piece of furniture.
The issue is that while from the side, the wood grain patterns of the plywood panels look pretty attractive, it's a bit of a different story when you look on the edge of the panels and see the mismatched layers of wood that gives plywood its name.
Since one of the edges of the drawer cabinet will be part of the desk front, I really wanted to create the effect that the cabinet was made from solid wood.
While there may be a few ways provide a more natural wood look to the end grain of plywood, most of which require the creative use of paint and artistic ability, I usually rely on wood veneer tape for this sort of application.
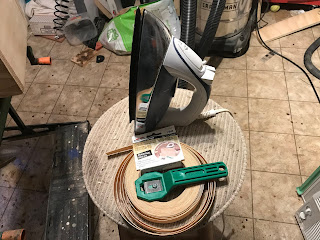
The nice thing about veneer tape is that it is made from real wood and can be easily applied with heat from a regular old laundry iron.
The only trick is to trim the excess veneer off of the plywood so that you have a nice neat seam.
Luckily you can buy a veneer trimmer any almost any hardware store to make that particular job easier, but in a pinch, a sharp knife or razor blade will do if you're careful
To apply the veneer tape, I first cut pieces of tape that were slightly longer than the edge that I want to cover.
Next, I placed the piece of tape as neatly as possible along the edge and gently ran the iron along the edge, making sure that the veneer was heated as evenly as possible.
Once the veneer was adhering to the edge of the plywood, I removed the iron and let the strip cool, which permanently bonding the strip to the plywood when the glue hardened.
Once the glue had dried, I then took the veneer trimmer and removed the excess veneer.
I repeated the process for the remaining edges of the cabinet.
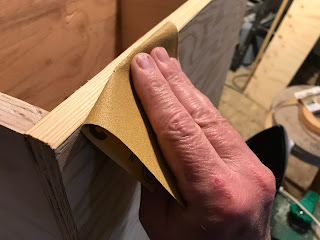
Finally, I gave the edges a light sanding to blend the edge of the veneer strip into the plywood panel.
That then completes the build of the drawer cabinet.
The next thing we need to tackle the drawers, and that's where things can get a bit fiddly...


No comments:
Post a Comment