Showing posts with label Painting. Show all posts

Tuesday, December 21, 2021

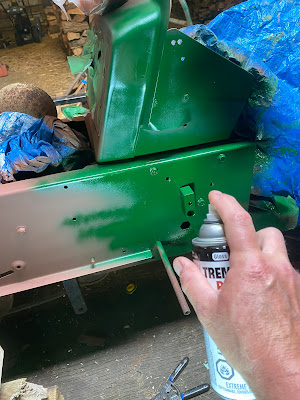
Project Basket Case - Giving Things a Nice Coat of Paint


Spiffing things up with new paint

Yes, it's been a little while since the last update. This fall I started a new job which has taken a fair bit of my time as of late, and just life, in general, has been making its presence known.  In particular, I have noticed quite a significant uptick in requests for some of my laser engraved signs. So I have been spending quite a bit of time in the shop, just not enough time for writing it seems... 

Now that I have my excuses out of the way, it's now time to focus on the next chapter of bringing my basket case tractor back to life. 

Sunday, May 16, 2021

An Enclosure for My 3018-PROVer CNC Router - Part 3


Finishing up the enclosure

After a couple of weeks of construction, I was finally at the point now where I can finally put everything together and give my CNC router a decent home. 

The first order of business was too pretty up the enclosure up a little. While the enclosure is going to be serving a purely utilitarian purpose, I really wanted to make it look as attractive as possible since it will be sitting out in the open on my workbench. 

To accomplish that, I decided to give the entire closure a couple of coats of black paint (though any color would have been fine - I just happen to have a lot of black paint on hand).

Sunday, August 9, 2020

Building a Cheap Elliptical Trainer

Exercising the legs

Every Father's Day I always have the same issue, what do you get for a Dad that already has every conceivable tool and gizmo you can think of? (mind you, I have also noticed that my kids have a similar problem). 

Most years the situation was solved with the purchase of a gift card from his favorite tool emporium, but even that gets a bit stale after a couple of years, and you end up back at square one again. 

In the past couple of years, my Dad has started to have a few mobility issues which could be greatly helped with some regular exercise of his legs. 

A neighbor of theirs recently got an elliptical trainer for this exact same purpose and they claim that it made a world of difference for them. Grabbing onto this as the perfect gift for Dad, I did some online shopping for something similar. 

After quickly noticing the $500 - $1,000 price tag, I quickly had to do a bit of a rethink. While my father is certainly worth the cost of such a machine, I did have a bit of issue about paying that much for what was basically a fancy box with pedals sticking out of it. - effectively a fancy unicycle that doesn't go anywhere.

From what I could gather, the basic premise of the trainer is to provide a low impact way of giving the benefits of riding a bicycle, including providing a measure of pedaling resistance to build leg strength.

It was then it struck me that I already had the building blocks for building my own elliptical trainer out in the parts bin that is my shed.

Sunday, November 3, 2019

Table Saw Stand from Pallets

A stand fit for my new table saw

As I may have mentioned in previous posts, things have been going under a bit of a transformation in the shop. 

This summer marked a move to some better (albeit still "small") shop space. As part of this move, I decided to treat myself to an upgrade to my old table saw. 

In my past couple of posts, I've discovered and have been experimenting a little with that outcast of the shipping world, the lowly pallet. 

Since I was impressed on how well my new workbench had turned out. I wanted to continue my experience of using pallets to further improve conditions in the new shop space. 

My new table saw is classed as a compact table saw which is meant for use at construction sites. While a very capable saw, in order for it to be used properly, it really needs to be set securely on a stand or a tabletop. 

When I looked at what a store-bought stand would cost, I realized that I was looking at least a couple of hundred dollars for a custom stand for the saw. 

Since I had a few leftover pallets from my workbench project sitting in the corner of the shop, something told me that I could probably build something similar for a lot less money. 

Sunday, October 6, 2019

Project - Junkyard Desk Chair


What sparked this project was a sudden need for a new desk chair.

The back of my old desk chair was broken the other day when I leaned back a little too far. Thankfully the only other thing that got injured was my pride.

When I popped out to the store to look at getting a new chair, I was downright shocked by the prices that are being asked for a desk chair these days.

Then it struck me, during the little tours of my local auto salvage yard, I did notice that there were an abundance of very well made seats that if you looked at them the right way, could make very serviceable desk chairs.

At around 20 dollars for a seat, the price was certainly right.

After a quick trip back to the salvage yard, I started work on building my Junkyard Desk Chair.

Sunday, January 20, 2019

Quick Tip - Disposable Paint Funnel

A simple one time use funnel for those painting jobs


This week I'm going to go a bit low key, in that what I am building doesn't require batteries or the creation of sawdust, it's just a simple little solution for a little pet peeve of mine. Rest assured, the soldering iron and miter saw will be back in action again soon!

Recently we gave the family room in the house a long overdue face lift. As with any remodeling job, that also entailed applying many, many coats of paint on the walls.

While I try to make sure I have the right amount of paint on hand, invariably I always seem to have a little bit left over in the paint can once the job is done.

Now I always consider having a little bit a paint left over to be a bit of a good thing, since I can always use some paint to touch any scuffs that may happen in the future. What isn't a good thing is having a little bit of paint left over in the bottom of a large paint can, since that will guarantee that the paint will eventually turn into a hard mass at the bottom of the can even if you do securely put the lid back on.

So the best way to preserve your left over paint is to put it in a smaller container, but that does present its own challenges.

The biggest challenge is that without fail, pouring paint straight from a large can into a smaller one can create a bit of a mess (especially if you tend to be clumsy like me!)

To combat the mess potential, I use a "throwaway" funnel from a 2 liter soda bottle to transfer paint from one can to another.